

I’ve never been a fan of any pencil eyeliner at all. I gave up on pencil eyeliner a few years ago after wasting money on countless brands that never fail to smudge on me. Ever since I started watching YouTube, I notice that quite a number of beauty guru prefer pencil eyeliner than liquid eyeliner. It is understandable due to skin type and weather differences. So why are you reading this if I’ve given up on pencil eyeliner, eh? The story goes like this. I went back to work not too long ago and since it’s a different office environment, I no longer have the privilege to do my makeup in the office. So I have to rush everything in the morning and doing a precise eyeliner using a liquid pen is too time consuming for me especially when I’m doing my makeup in a dark room.
Today I’m going to share with you my favourite pencil eyeliners, tips, tricks and three different application method that you can master too.

I have oily lid so kohl or normal pencil eyeliner will not work on my lid. The only two brands and type that I find doesn’t smudge on me are Stila Smudge Stick Waterproof Eye Liner and MAKE UP FOR EVER Aqua Eyes. I bought these from their 2014 holiday collection but fret not, these are permanent so you can get it from Sephora anytime.
Stila Smudge Stick Waterproof Eye Liner is probably the highest raved and talk about. However I don’t like the twist mechanic. I had one from Stila In The Know palette and I thought it was faulty. In the end I ruined the pencil eyeliner and I still didn’t know what went wrong. When I Google for an answer then only I found out that the twisting mechanic is different from others. It requires a few rounds of twisting to get the lead up and once it’s up, it won’t go down again. It’s a one-way twist mechanic. The only downside of this is that the lead will always be blunt.
MAKE UP FOR EVER Aqua Eyes is my latest favourite. Their AQUA series is my absolute favourite as it is made to withhold water, sweat and sebum. At first I wasn’t keen with the need to sharpen the pencil and after using it for a few times, I’m glad I can sharpen it, unlike Stila Smudge Stick.
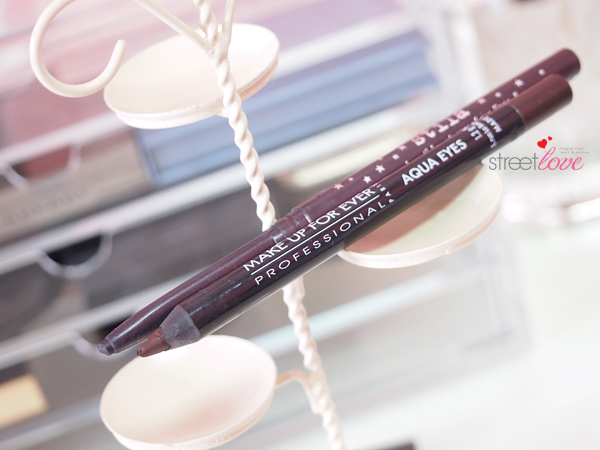
Stila and MAKE UP FOR EVER comes in a different packaging but the formula is quite similar. Both are extremely creamy, smooth, easy to apply, intense pigmentation and of course waterproof. Once they set, they stays on until I remove them with eye makeup remover. Somehow for pencil eyeliner, I’m not keen with black. Instead I opt for brown or any color that is dark enough to give my eyes definition. Just not black black.

I think I have around 10 pieces of Stila Smudge Stick and MAKE UP FOR EVER Aqua Eyes that I’m constantly thinking of different method to use them. At the moment I’m on three different method. It’s very simple. Once you know the trick, you will find yourself having fun using pencil eyeliner that you didn’t want to go back to liquid eyeliner like I do.
Inner Lash Line & Waterline Lining
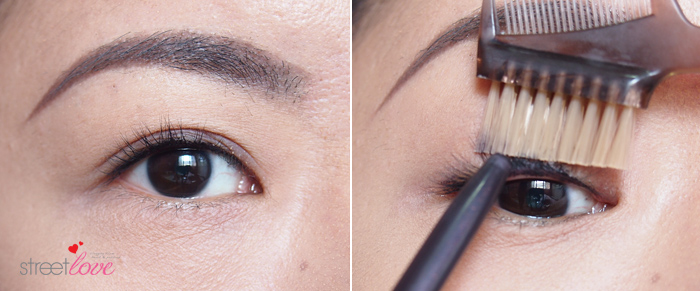
Let’s begin with a simple and versatile method that even somebody that doesn’t put on makeup will be able to do in a jiffy. There is a gap between the upper lash line with inner lash line and waterline. Just take a brow comb or a cotton bud, place it on the lid and gently press down to reveal the inner lash line. Line the inner lash line entirely. I like to go all the way to waterline as well. You will notice that the eyes are more awaken, fresh, bigger and more define when you line the inner lash line. I like to do this when I don’t feel well because I can just swipe on a light eye shadow on the entire lid and off to work. All these are done in less than 5 minutes.
Winged Eyeliner
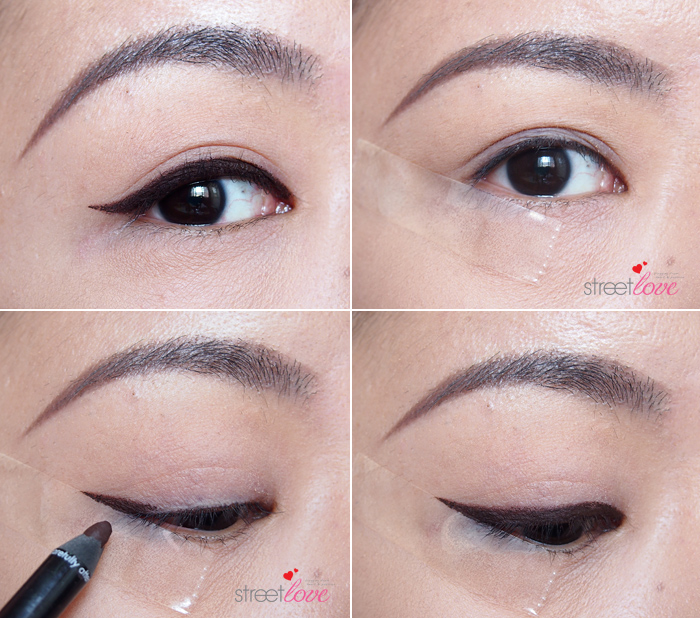
This is probably the one method that I do on daily basis and it’s my favourite too. Most beauty guru prefer to do winged eyeliner using pencil because of the softer look and opaque matte finishing the pencil gives. I have friends telling me that they like to use pencil eyeliner but they can’t do a flick at the end. Yes you can. Just use the cellotape method. You can start any way you like but I always start with the flick first. Line the inner lash line and waterline as well. And who say it’s hard with pencil eyeliner, eh? In fact this method is way easier and faster than liquid eyeliner.
Smokey Eyeliner
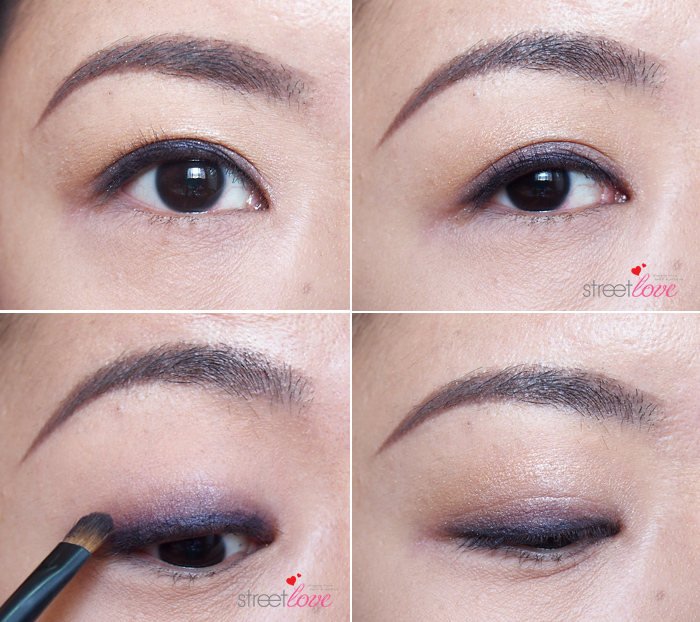
I learnt this trick a few years ago from Burberry makeup artist, Adrian Sin. In fact, I’ve done a tutorial post before 🙂 . This is probably a method that I can be hooked for weeks because it’s really very simple and fast. When working with pencil eyeliner, always remember to work fast. Do one eye at a time. Simply just draw a line on the upper lash line. The line doesn’t need to be precise. Then use a small smudge brush and start smudging the eyeliner up. I like to add more eyeliner near the lash line for more definition. Then apply any shade of eyeshadow on top of the eyeliner. The best part of this look is that nothing need to be precise. Don’t forget the inner lash line and waterline as well.
Sounds and look easy isn’t it? It is. All you need is a little creativity and you can make something work at the simplest and easiest way. Try these method and let me know how it goes! 😀


Comments (16)
Thanks for this dear 🙂 I always find it hard to use pencil liners because they always smudge on me, so I almost always opt for liquid liners instead. I myself got the SSS last year during the sales, but have not used it until now. With your tutorials, I’m quite excited to see how I can use the different methods, especially the third one, to my advantage 🙂 Thank you!
You and I both have the same problem with pencil eyeliners. I bought SilkyGirl 24H something pencil eyeliner last weekend. OMG. That thing once it’s on the eye, it doesn’t budge. I made a mistake and wanted to correct it with cotton bud but it doesn’t work 🙁 . Have to use miceller water. That also took a bit of effort to remove. My eyes was tearing just now and it’s still there haha. No wonder I heard SilkyGirl is good.
Nice tips! I like the pencil liners for filling in the space between the lashes but prefer the liquid type for the wing.
I couldn’t help but notice your precise brow. I am hopeless at precision brows.
I know it’s off topic but you are the queen of the brow pencil too and I would be grateful if you would recommend any brand for a waterproof/ smudge proof brow pencil.
Thanks, Fiona!
Thanks! Glad you like it!
I’m wearing my brow much more straighter now but sometimes I accidentally did it slightly archy. I must admit, I still like brows that are slightly arch 🙂 . I’m currently on 3 different brow pencil. ZA Brow Liner in GY951 Natural Gray, Covo Fearless Waterproof Auto Brow Pencil in Cocoa Brown and Muji. The one you’re seeing in this post is Covo. It’s super fine so I can do a more precise line. But it’s very pigmented and dark. I also apply a coat of Eyeko Brow Gel. That’s what makes the brow hair looking visibly strand by strand.
I usually do the wing one. Recently I will do the smokey one but I am just not brave enough with the eyeshadow. Still need more practice.
I love winged eyeliner 😀 . Just swipe the eyeshadow over the smokey eyeliner. No need to be very precise. It will look so much better 😀
*bow* you are the master^^ Thank you for sharing. I went back to sephora for an exchange for Stila Smudge Stick. I thought it’s faulty!! I know now it’s not after reading your review. Feel so embarrassed now :(. I can’t do winged eyeliner at all. I really have to salute you for doing it so perfectly even with pencil^^
Haha not master yet. I’m still learning and practicing as I go 😀 . Aiks? You too went for an exchange?? I’ve been reading Sephora Facebook page and that many people thought the eyeliner is faulty. It is not. It’s just not the kind that retract. I have no problem with it after finding out.
Winged eyeliner require some practice. After that you’re good to go! I still can’t do an even wing till to date lol
I only manage to try the smudge stick when I bought their ‘In the Light’ palette and dang it kinda smudges a little on me 🙁 i’m not sure if it’s only this color smudges or…
if you had a chance give the 24/7 from urban decay a try. I simply love them! *psssst* although the color perversion may tend to smudge a tiny bit due to the formulation is a bit on the soft side.
Hmmm I have the oiliest lid ever and Smudge Stick doesn’t smudge on me. Could be only that color. I have ‘In The Know’ palette and the eyeliner is fine on me too. Oh yeah. I heard UD Perversion smudges on many people. It might be the color also. Will give it a try when I have the chance 😀
Fantastic post! Love all the sleek and clean finishing! You are the master indeed 🙂 Oh, so that’s what the other end of the brow comb is for! Lol. I am so so enlightened now because for the longest time, I only know how to use the comb and not the brush. Oh my… I am such a noob! Thanks for the great tips, ever so patient and detailed with step by step dummy proof guide.
Thanks dear. I’m glad you like it 😉
The brow comb? Oh! The brush I usually use it to comb out eyebrow pencil to soften the brow. And of course to lift my lashes up so that I can line the inner lash line and water line 🙂
My pleasure to share these tips!
good tips, I like 2nd 😀
Thanks. 2nd is my fav 😀
1st one, frankly I scare I poke my eyes!! 😛
Hehe 😛 won’t. You’re just lining the lash root part 😀